

I love greenhouses, any size. The more creative, the more I love them. Upcycling is where I try to make something out of something else. My current yard is not big enough for a full size greenhouse. I would love to have a 40 foot greenhouse where I could grow things year round. This summer I want to find some windows to build a small greenhouse. Until I get to that project I decided to try an even smaller greenhouse. I was inspired by Pinterest. I love how they came out and plan to make more and make changes to make them even more my own style.
Materials you will need:
You will need 6 picture frames. (I bought mine at the Dollar Store)
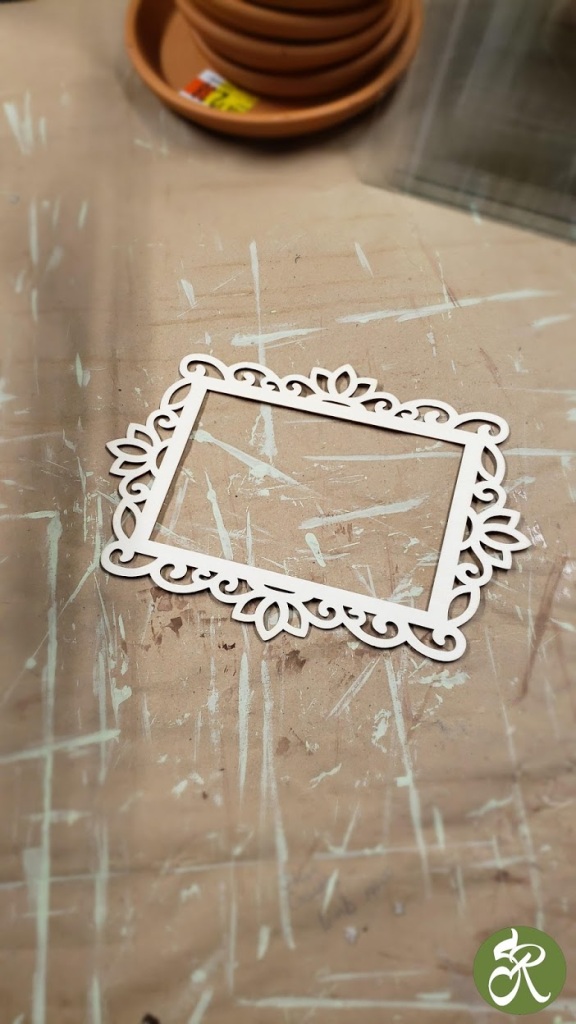
Laser cut frame (I bought this at Hobby Lobby, sometimes they have them at the Dollar Store.)
E6000 glue
glue gun
paint (color of your choice.)
water sealer (if you are putting it on the patio)
Box cutter
-
Laser cut frame -
6 frames the same size -

Take the glass out of the frames


You will take the frames glass out and the little black things that hold the glass in the frames. Set the glass aside for now. The rest you can throw away unless you can think of another project to use them for. Once you have all the frames without glass you can gently sand the frames and then I painted it with color of paint of your choice. I used chalk paint.
Once the paint is dry I antiqued the frames. There is several ways to do this. I used Burnt Umber acrylic paint. One greenhouse I dry brushed it on and wiped off what I did not like. The second greenhouse I did I just watered down the paint to a water color and painted it on and wiped off what I did not want.
Once you start constructing your greenhouse you will want to reinforce the roof. To do this you will glue first with E6000 and then with the glue gun. The reason for this is so the glue gun glue will hole the pieces together until the E6000 dries. You will glue a dowel on the inside of the roof and let it dry.
You will be gluing the glass back into the frames. It is not the neatest job to do this. I used both glues to do this. I did all 6 windows at this point. You will want to give this some time to set before continuing because you will be handling this greenhouse a great deal.
-

glue sides together, the roof has a dowel at the peak -

If you do not use the dowel the roof will not stay together.


You will glue the top side of one frame to the side of another (see example). Until you have all four sides glued.
At this point once everything has dried and the glues are all set you will want to go around the roof and make sure the roof is glued to the house anywhere they are touching.

Now this laser cut from is made from balsa wood and easy to break. You will want to measure where you want to put this on the house (or not at all if you want). To cut this use an Box cutter, anything else will just break it to pieces. This will need to be painted and antiqued like the rest of the house. As you can see I put one at each end of the house.

There is no bottom to the greenhouse. You just set this over the top of what every you want to display.

Very easy to make this and if it is glued together well it will be very sturdy.


As you can see each one is unique and you are only limited by the size of the frames. The small greenhouse is with wider frames and came out just a nice. It is made exactly in the same way that the larger one was.


I hope that you try these out. I made an extra one for my mother for Mother’s Day. She loved it.
Have fun, be safe, until next time,
Roxanne